Set Up Raspberry Pi OS
Install Software Locally
Section titled “Install Software Locally”The tools below are linked to their official download pages.
macOS users can install tools both using Homebrew. Windows and Linux users can download installers directly from each link.
For macOS users with Homebrew:
brew install sdformatter raspberry-pi-imagerFormat the SD Card
Section titled “Format the SD Card”- Insert a microSD card, then open SD Card Formatter and choose the card from the Select card dropdown.
- Select Format to format the card.
- The default settings are fine: Quick format and no volume label.
- Exit SD Card Formatter and leave the SD card inserted.
Create the Pi OS Image on the SD Card
Section titled “Create the Pi OS Image on the SD Card”Raspberry Pi Imager makes the SD card a bootable drive. After you set up the SD card, you’ll install it in the Raspberry Pi as its primary drive.
- Open Raspberry Pi Imager.
- Select your Raspberry Pi Device: Raspberry Pi 4.
- Choose operating system: Raspberry Pi OS (64-bit).
- Select your storage device: Select the SD card.
- Customisation: Choose hostname:
pi-hole. - Customisation: Localisation: Select your location and time zone.
- My selections:
- Capital city:
Washington, D.C. (United States) - Time zone:
America/New_York - Keyboard layout:
us
- Capital city:
- My selections:
- Customisation: Choose username: Create a user account.
- The examples in this guide use the username
pi-admin.
- The examples in this guide use the username
- Customisation: Choose Wi-Fi to configure the wireless network connection.
- Select Next if you will connect using Ethernet.
- Customisation: SSH authentication: Enable SSH and select Use password authentication.
- Optionally, use public key authentication for more secure access.
- Write image: select Write.
- In the popup, review the warning, then select I understand, erase and write to continue.
- When the write completes, remove the SD card from your computer and insert it into the Raspberry Pi.
- Plug in the Pi and give it a few minutes to boot.
Rebuilds and Upgrades: Confirm Your Linux Version
Pi-hole v6 requires Debian 11 (Bullseye) or later.
If you’re on an existing Pi, use cat /etc/os-release | grep PRETTY_NAME to confirm the release version before you continue:
pi-admin@pi-hole:~ $ cat /etc/os-release | grep PRETTY_NAMEPRETTY_NAME="Debian GNU/Linux 13 (trixie)"Configure Raspberry Pi OS
Section titled “Configure Raspberry Pi OS”-
Find the Pi’s IP Address:
From your device ping -c 3 pi-hole.localFrom your device ping -n 3 pi-hole.localWindows users: If
pi-hole.localdoesn’t resolve when you try to SSH, try thearpcommand:From your device arp -aLook for a recently added entry and try to SSH to it in the next step. Or search your router’s documentation for something like “DHCP client list” to help find the Pi on your network.
Other ways to find the Pi’s IP
- Check your router
- Look for a page that says “DHCP clients” or “connected devices.”
- Scan the network
- Use
nmap -sn 192.168.1.0/24(adjust the subnet for your network,192.168.1.0in this example).
- Use
- Check your router
-
SSH into the Pi from your local terminal:
From your device ssh pi-admin@pi-hole.localYou can also use the IP you find in step 1 instead of
pi-hole.local. -
Enter the password you set in Raspberry Pi Imager when prompted.
-
If you configured Wi-Fi and also plugged the Pi in via Ethernet, your Pi will have two IP addresses.
To make it easier to enable network-wide blocking later, identify the Pi’s Ethernet IP address.
Confirm the Ethernet IP address from inside the SSH session on the Pi:
From the Pi ip addr show eth0
TP-Link Omada-specific steps to find and fix the Pi’s IP
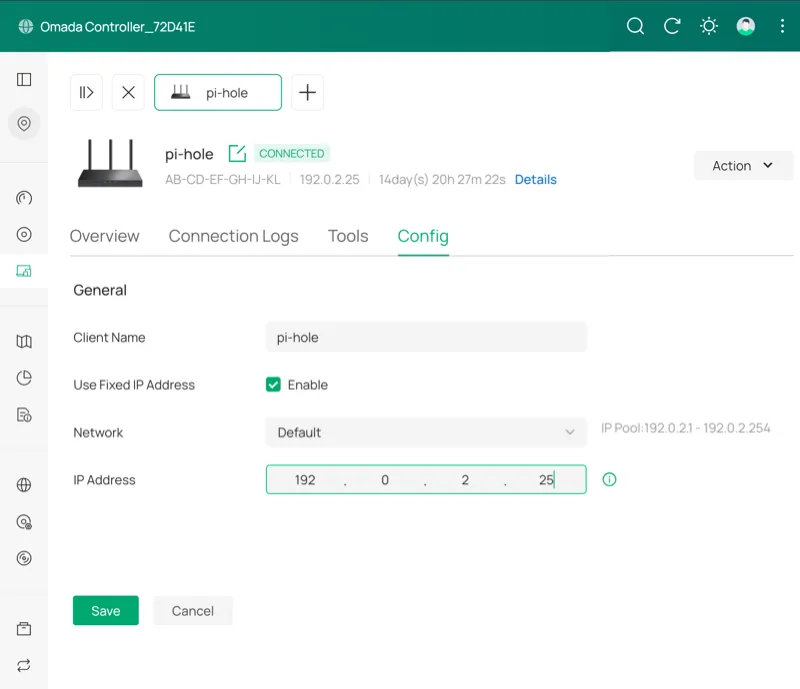
Section titled “TP-Link Omada-specific steps to find and fix the Pi’s IP”Find the Pi and set a fixed IP on a TP-Link Omada controller
-
Log in and select the site’s name.
-
Select Clients then Wired to filter the table of connected clients.
-
Select pi-hole in the Client Name column to open the Details sidebar.
-
Select Manage Client > Config and check Enable next to Use Fixed IP Address.
-
Select Save.
You should still follow the steps in the Set a Static IP section when you get there.
Require a Password for sudo Commands
Section titled “Require a Password for sudo Commands”The non-root user that Raspberry Pi Imager created can run sudo commands without a password.
Raspberry Pi Imager creates a configuration file to enforce passwordless sudo.
Remove the file so that sudo commands require authentication.
-
Remove the configuration file:
From the Pi sudo rm /etc/sudoers.d/010_pi-nopasswd -
Log out of the SSH session, then log back in:
Terminal window exitssh pi-admin@pi-hole.local
Set Up a Firewall on Your Pi With UFW
Section titled “Set Up a Firewall on Your Pi With UFW”UFW (Uncomplicated Firewall) restricts which ports are accessible on the Pi. Pi-hole requires ports for DNS and the web interface. SSH is allowed for remote administration.
-
Install UFW:
From the Pi sudo apt install ufw -
Allow SSH immediately to avoid getting locked out later:
From the Pi sudo ufw allow OpenSSH -
Set the defaults for incoming and outgoing connections:
From the Pi sudo ufw default deny incomingsudo ufw default allow outgoing -
Add the following to
/etc/ufw/applications.d/piholeto group the required ports into a single app profile rule. Remember to usesudoto edit files throughout this guide:/etc/ufw/applications.d/pihole [Pi-hole]title=Pi-holedescription=Pi-hole DNS and Web Interfaceports=53/tcp|53/udp|80/tcp|443/tcpIf you don’t have a preferred terminal-based text editor, you can use
sudo nano /etc/ufw/applications.d/pihole. That will create the file and open the nano editor so you can add the rule.To save and exit nano: CTRL+X, then Y, then Enter.
-
Allow the profile:
From the Pi sudo ufw allow Pi-hole -
Enable UFW with the new configuration:
From the Pi sudo ufw enable -
Verify the rules are active:
From the Pi sudo ufw status
If you plan to use Pi-hole as a DHCP server
Pi-hole as a DHCP server is not covered in this guide, but this seems to be an issue people encounter.
If you plan to use Pi-hole as a DHCP server, add another ufw allow:
sudo ufw allow 67/udp comment 'DHCP'Protect SSH with Fail2Ban
Section titled “Protect SSH with Fail2Ban”Fail2Ban automatically bans IPs that fail too many login attempts. This helps minimize the risk of brute-force attacks.
-
Install Fail2Ban:
From the Pi sudo apt install fail2ban -
Create
/etc/fail2ban/jail.local:/etc/fail2ban/jail.local [sshd]enabled = truebanaction = ufwmaxretry = 4bantime = 1hfindtime = 10mbanaction = ufwtells Fail2Ban to use UFW to block IPs instead of managing iptables (an alternative way to manage network access to the Pi) rules directly, keeping all firewall rules in one place.Remember to use
sudoto edit the file (sudo nano /etc/fail2ban/jail.localif you’re new to this). -
Enable and start Fail2Ban:
From the Pi sudo systemctl enable --now fail2ban -
Verify the SSH jail is active:
From the Pi sudo fail2ban-client status sshdYou should see the jail listed as active with 0 currently banned IPs on a fresh install.
Set a Static IP Address
Section titled “Set a Static IP Address”Pi-hole needs a stable IP address. If the router reassigns the Pi’s IP after a reboot, all your DHCP clients will point at the wrong address and potentially lose access to the Internet.
These steps use nmcli to lock the IP.
They set the Ethernet connection name as a temporary shell variable.
The variable is cleared when you exit the session.
-
Set the static IP, gateway, and DNS.
This example is intentionally set to fail if you don’t adjust
YOUR-PI-IPandYOUR-GATEWAY-IP. This way you’re less likely to get locked out if you don’t change the example first:From the Pi CON=$(nmcli -t -f NAME,DEVICE con show | grep eth0 | cut -d: -f1) && \echo $CON && \sudo nmcli con mod "$CON" \ipv4.addresses YOUR-PI-IP/24 \ipv4.gateway YOUR-GATEWAY-IP \ipv4.dns "1.1.1.1" \ipv4.method manualHelp with this step
- This setting uses the shell variable
CONto make it easier to copy and paste the command consistently. The first line finds the device’s name, and sets it as the variable.echo $CONon the second line displays it in the terminal for your information. - Replace
YOUR-PI-IPwith the Pi’s IP you found in step 1 of Configure Raspberry Pi OS. - Replace
YOUR-GATEWAY-IPwith your router’s IP (or your gateway if you already know it).
For more about these settings, see the Red Hat networking guide.
- If you do get locked out, you’ll need to access the Pi directly. Then run this same command in the terminal with the correct IPs.
- This setting uses the shell variable
-
Apply the changes:
From the Pi sudo nmcli con up "$CON" -
If you changed the IP address, your SSH session will drop.
Still in the terminal, but on your local machine, remove the old cached keys and reconnect at the new IP:
From your device ssh-keygen -R YOUR-OLD-PI-IPssh pi-admin@YOUR-PI-IPAccept the new host key when prompted.
-
Verify the settings persisted on the Pi:
From the Pi ip addr show eth0Confirm your static IP is listed.
-
Reboot the Pi:
From the Pi sudo reboot nowWait a few minutes before you SSH back in.
Checkpoint
Section titled “Checkpoint”At this point you have a hardened Raspberry Pi OS ready for Pi-hole.
Before you continue, confirm the following:
- SSH access works:
ssh pi-admin@pi-hole.local. - UFW is active with Pi-hole rules:
sudo ufw status. - Fail2Ban is protecting SSH:
sudo fail2ban-client status sshd. - The Pi has a static IP that won’t change on reboot.
- If you run into issues, see Common Pi-hole Issues.
The next page covers installing Pi-hole, configuring DNS, and optionally adding unbound for recursive resolution and Netdata for monitoring.